Home Blog Page 18

Using Ready Made for You Graphics Templates

0

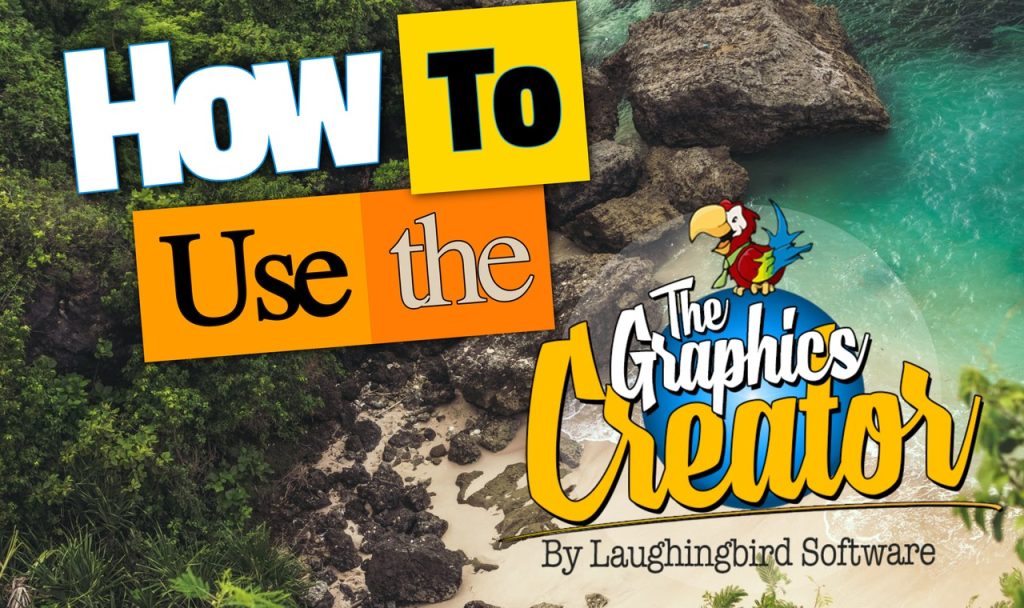
Using Ready Made for You Graphics Templates Inside The Graphics Creator

Ever wanted to create pro-level graphics without breaking a sweat? Good news—you’re in the right place! With The Graphics Creator, you can tap into ready-made templates that make designing effortless. And if you think “ready-made” means “boring and basic,” think again. These templates are designed to help you create eye-catching visuals for anything from social media posts to professional business branding.

Why Use Ready Made for You Graphics Templates?

Let’s be real—not all of us were blessed with the magical ability to perfectly center text on an image. And even if you are, who has the time to start from scratch every single time? That’s where these templates become your best friend. Here’s why you should use them:

  • Time-Saving: No need to spend hours designing—you can customize a template in minutes.
  • No Design Experience Needed: You don’t have to be a graphic designer to create professional visuals.
  • Customization Available: The templates are a starting point—you can tweak colors, text, images, and more.
  • Designed for Various Needs: Whether you need YouTube thumbnails, social media graphics, or business cards, there’s a template for it.
  • Consistent Branding: Businesses can use templates to create a cohesive brand identity without hiring a designer.

How to Use the Done-for-You Templates in The Graphics Creator

If you’ve never used The Graphics Creator before, don’t worry—it’s easier than trying to assemble IKEA furniture. Here’s how you can get started:

Step 1: Open The Graphics Creator

First things first, launch the software. Whether you’re using the downloadable version for Windows/Mac or the online cloud version, the templates are waiting for you.

Step 2: Choose Your Template

Browse through the template library. You’ll find a variety of options, including:

  • YouTube thumbnails
  • Social media posts (Facebook, Instagram, Twitter, etc.)
  • Logos
  • Business cards
  • Marketing graphics

Pick the one that best fits your needs—it’s like online shopping, but without the regret of buying something you don’t actually need.

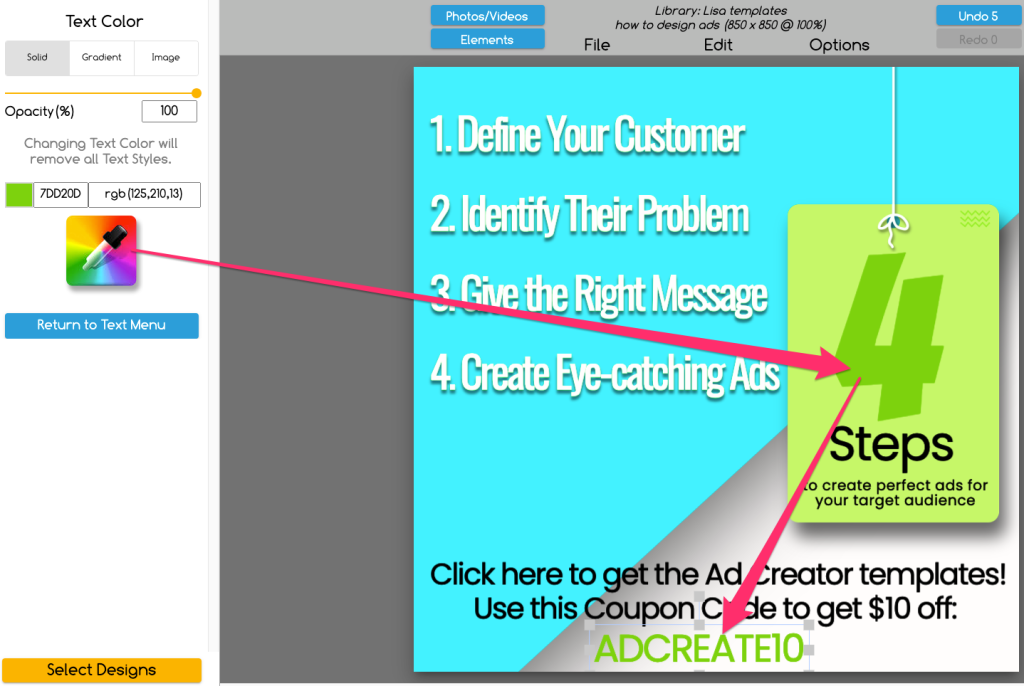
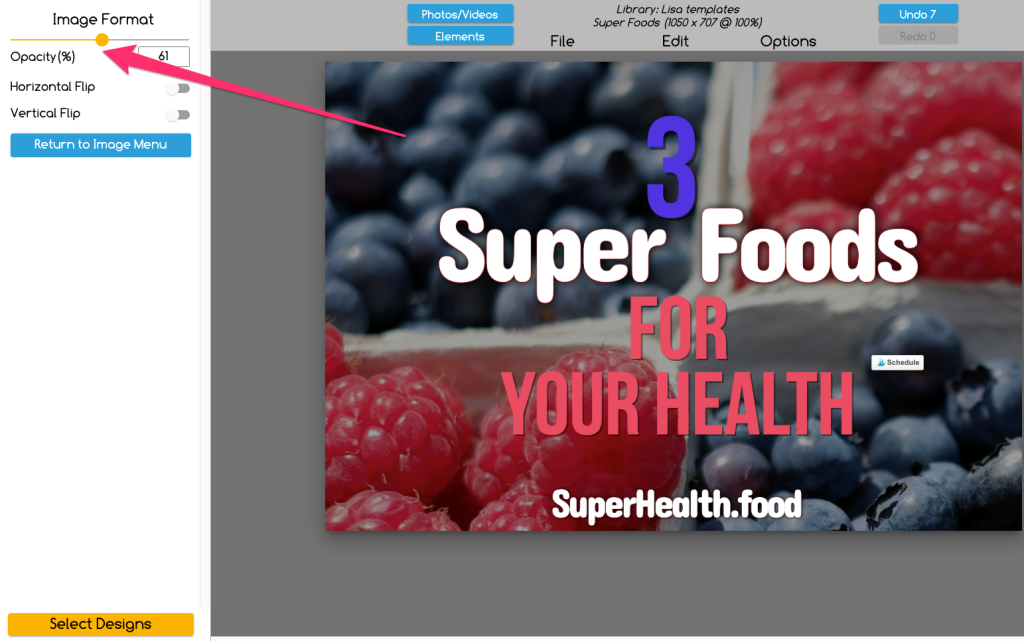
Step 3: Customize Your Template

Once you’ve chosen a template, it’s time to make it your own. You can:

  • Change the text to fit your message.
  • Adjust the font style, size, and color.
  • Swap out images with your own uploads or use built-in graphics.
  • Add visual effects like shadows and reflections.

This part is totally up to you—whether you want to keep it simple or go all out with effects, The Graphics Creator gives you full control.

Step 4: Save and Export

Once you’re happy with your design (or at least until you start overthinking everything), save your work. The software allows you to export your graphic in different formats, making it easy to share or upload wherever needed.

Other Videos in the Series

Want to learn more? I’ve got you covered. Check out the full video series where I walk you through the entire process, step by step:

Frequently Asked Questions

Do I need design experience to use these templates?

Nope! If you can drag and drop, you can design with these templates.

Can I customize the templates?

Absolutely! Change the text, colors, images—make them as unique as you want.

Is The Graphics Creator an alternative to Photoshop or Canva?

Yes! It’s designed to be simpler and easier to use than Photoshop, while offering more customization options than Canva.

Final Thoughts

Using ready-made templates in The Graphics Creator is the perfect way to create professional designs—without stressing over details. Whether you’re a business owner, content creator, or someone who just wants their graphics to look amazing, these templates are a game-changer.

Follow my blog with Bloglovin

How to Make Social Media Design: Six Easy Ideas for Businesses

0

Social media is here to stay, and competition for online businesses is fierce. That means your designs need to be eye-catching, engaging, and effective at grabbing attention. If your posts are the digital equivalent of watching paint dry, no one will stop scrolling to check them out.

The good news? You don’t need to be a graphic design wizard to create stunning social media designs. With simple-to-use software like The Graphics Creator, you get access to drag-and-drop tools, professional templates, and design features that make the process super easy.

Want to create engaging designs that help grow your business? Follow these six easy ideas to take your social media design game from blah to brilliant!

1. Create a Social Media Profile Image and Cover That Work Together

Your profile image and cover design set the tone for your social media presence. They should complement each other like peanut butter and jelly (or coffee and Mondays).

A good approach depends on your brand:

  • If you are the face of your brand, using a high-quality photo of yourself works well.
  • For businesses, a secondary logo is great for the profile image, while the banner can showcase your brand’s feel.
  • Ensure the colors, fonts, and aesthetic tie together across both elements.

Take a look at how we designed the Laughingbird Software Facebook banner using The Graphics Creator:

An example of a Facebook page banner graphic with matching profile image.

We kept the tropical look and feel of our brand, incorporated our primary logo, and used a secondary logo in the profile picture for a cohesive presentation. Plus, there’s a personal image in the banner helping humanize the brand.

Bottom line: Keep your designs complimentary. This consistency helps people recognize your brand instantly.

2. Stick to a Few Consistent Fonts and Colors

Choosing the right colors and fonts is like dressing your brand every day. If you’re constantly switching styles, you’ll confuse your audience. Instead, follow these basic design rules:

  • Limit yourself to 2-3 main colors in each image.
  • Use just 1-2 fonts – but logos can have a third.
  • Ensure every social post uses colors and fonts that align with your overall brand identity.

Here’s an example. In the image below, we’ve used stock photography, but we’ve personalized it with brand-specific fonts and colors:

Notice how the main colors are orange/yellow and white, which align with our brand’s palette? Sticking to a defined color formula makes your business instantly recognizable.

3. Pair Fonts That Contrast Yet Complement

Nothing screams “unprofessional” more than a mismatched, chaotic font selection. But how do you choose the right mix?

  • Pair a Serif font with a Sans Serif font.
  • Stick to two fonts at most to avoid a design disaster.
  • Use variation – make one font bold or a different color to make it pop.
Find out the 6 Social Media Design Ideas you Need for Marketing Your Business
Image created with The Graphics Creator. Share this pin on Pinterest!

The comic book-style font adds flair, while the simple sans-serif font keeps things clean. Perfection!

4. Match Your Text Color with Your Background

Instead of picking random colors for text, use a color from your image or background to keep things cohesive.

The Graphics Creator makes this super easy with a built-in color picker! Just highlight the text, click the color picker, and select a shade from anywhere in your image.

It’s a simple trick that makes your designs look polished and professional.

5. Use Transparency to Make Text Stand Out

Is your text hard to read against a busy background? Reduce background opacity to make your message pop.

Using the Opacity tool to change the background transparency

You can also add a transparent block behind text for an even sharper contrast.

6. Add Your Logo to Every Social Media Graphic

Avoid becoming one of those brands people see everywhere but never remember. Your logo should be on every graphic you post.

Need a logo? The Graphics Creator has templates to help create a unique brand design in minutes. Check it out here:

Final Thoughts: Create Social Media Graphics Like a Pro

Social media design isn’t just about pretty pictures – it’s about making an impact. Follow these six simple strategies to create eye-catching graphics that get noticed.

Want an easy way to start? Grab a free version of The Graphics Creator with ready-to-use templates and start creating today!

How to Make Stunning Pinterest Pins: DIY in Minutes

0

Feeling stressed about constantly needing fresh, attention-grabbing Pinterest pins? You’re not alone. Whether you’re tired of shelling out money to designers or just overwhelmed by DIY pin creation, it’s time to streamline your process.

Good news: You can easily create stunning Pinterest pins in minutes—even if your design skills are limited to drawing stick figures in MS Paint.

I’ll walk you through everything you need to know to pump out amazing Pinterest pins quickly and efficiently.

  • Why You Need Fresh Pins (and Lots of Them!)
  • The Perfect Pinterest Pin Dimensions
  • Choosing the Right Images for Your Pins
  • How to Brand Your Pinterest Pins
  • Secrets to Getting Your Pins Found in Pinterest Search
  • How to Batch-Create Multiple Pins at Once
  • What to Write in Your Pin Descriptions

By the end of this guide, you’ll have a treasure trove of pin-making tips that even seasoned Pinterest users might not know. Let’s dive in!

Why You Need Fresh Pins (and Lots of Them!)

Remember when Pinterest was all about repinning the same old content over and over? Well, those days are gone. Nowadays, the Pinterest algorithm favors fresh content—meaning brand-new pins.

Here’s why you should be creating fresh Pinterest pins regularly:

  • Pinterest loves fresh pins: The more new content you publish, the greater your chances of showing up in searches.
  • Your audience craves novelty: People scrolling Pinterest want new, engaging visuals—not recycled content they’ve already seen.
  • More pins = more chances to go viral: The more you post, the higher the chances one of your pins will catch fire and bring major traffic.

Does this mean you need to publish 100 new blog posts a month? Nope. You can simply create multiple pins that promote the same piece of content in different ways (more on that later).

The Perfect Pinterest Pin Dimensions

Size matters—at least on Pinterest. While horizontal images might be great for Instagram, Pinterest favors vertical pins.

Pinterest’s recommended pin dimensions are:

  • Minimum: 600 x 900 pixels
  • Optimal: 1000 x 1500 pixels (2:3 aspect ratio)
  • Maximum: 1200 x 1800 pixels

Avoid straying from the 2:3 ratio. If your pins are too long, Pinterest may crop them in the feed, and if they’re too wide, they won’t stand out.

Choosing the Right Images for Your Pins

Think you can just grab any free stock image and slap some text on it? Not so fast. Pinterest rewards originality, so you’ve got to make your pins stand out.

Here’s how to make sure your pin images shine:

  • Use unique, eye-catching visuals: If your image looks like the 10 others on the same topic, people will scroll past.
  • Zoom in on parts of stock photos: Cropping a stock photo can make it look different from other pins.
  • Use textured or patterned backgrounds: Instead of always using plain images, try subtle patterns or gradients.
  • Incorporate motion: Using animated video pins can grab attention faster than static images.

Want details on creating motion video pins? Check this out.

How to Brand Your Pinterest Pins

You want people to recognize your pins as yours the second they see them. That’s where branding comes in.

Here’s how to make sure your brand shines through:

  • Add your logo: Place it somewhere non-intrusive (but avoid the bottom-right corner—it’ll get covered by Pinterest buttons).
  • Use consistent fonts and colors: If your brand has specific colors and fonts, keep them uniform across your pins.
  • Test different styles: This is Pinterest, not a high school yearbook. You don’t have to make every pin identical—just make sure they reflect your brand.

Grab some Pinterest templates to make pin creation even faster.

Secrets to Getting Your Pins Found in Pinterest Search

Pinterest is a search engine—like Google but prettier. If you want your pins to surface, you need to optimize them.

  • Use keywords in pin text: This helps Pinterest understand what your pin is about.
  • Name your image file strategically: Instead of IMG_1234.jpg, try easy-pinterest-pins-guide.jpg.
  • Make text easy to read: No one is squinting at 8-point cursive on their phone. Use large, bold fonts.
  • Stay helpful and inspiring: Make sure people clearly understand what your pin is offering.

How to Batch-Create Multiple Pins at Once

Why create one pin at a time when you can create a bunch in minutes?

Steps to efficient Pinterest pin batching:

  • Create a base template for your pins.
  • Swap out colors, images, and fonts to generate variations.
  • Rotate headlines and descriptions to test engagement.
  • Use Pinterest-ready templates to speed up the process.

What to Write in Your Pin Descriptions

Your pin description is Pinterest SEO gold. Write it wisely, and you’ll get way more eyeballs on your content.

  • Use natural-sounding keywords—don’t just stuff them in robotically.
  • Describe what your pin is about in a compelling way.
  • End with a strong call-to-action (e.g., “Click to get the full guide!”).

FAQs

How often should I create new Pinterest pins?

As often as you can manage! Ideally, post fresh pins daily, but if that’s unrealistic, aim for several per week.

Can I use the same image for multiple pins?

Yes—just tweak it. Change the text overlay, colors, or crop the image differently to make it fresh.

Now that you know how to make stunning Pinterest pins, get out there and start creating! 🚀

How to Create Your Own Brain Teaser Images with Answers

0

Brain teasers are entertaining, stimulating, and a great way to boost engagement. Whether you’re a business owner looking to captivate your audience or a teacher aiming to keep your students’ brains active, visual puzzles are effective. After all, a fun, colorful brain teaser grabs attention faster than plain text riddles.

But let’s be honest—finding the perfect puzzle picture that suits your needs can feel like searching for Waldo in a sea of red and white stripes. Sometimes, the images are blurry, sometimes they don’t make sense, and worst of all, some might even have copyright restrictions.

The good news? You can create your own brain teasers with ease! Whether you need riddles for education, social media engagement, or personal fun, designing your own puzzle images allows you to customize every detail to fit your goals.

And don’t worry—I’m here to walk you through everything. From picking the perfect brain teaser type to designing a high-quality puzzle complete with answers, you’ll soon be crafting brainteasers like a pro.

Choosing the Right Type of Brain Teaser Image

Before you start designing, let’s talk about the different types of brain teasers you can create. Whether you’re crafting a puzzle for fun, business engagement, or a classroom, the type of brain teaser matters.

Here are four main types of brain teaser puzzles:

  • Logic Teasers: These require a step-by-step thought process.

    Example: “Your mother’s brother’s only brother-in-law is asleep on your couch. Who is asleep on your couch?” (Answer: Your dad!)
  • Mathematical Teasers: Math-based brain teasers challenge numerical problem-solving skills.

    Example: “A family needs to cross a tunnel. Dad takes 1 minute, Mom takes 2 minutes, their son takes 4, and their daughter takes 5. They can cross only two at a time, and they have a torch that lasts 12 minutes. Can they all make it through?”
  • Lateral Thinking Puzzles: These require out-of-the-box, creative thinking.

    Example: “You place a coin into an empty bottle and insert a cork into the neck. How do you remove the coin without removing the cork or breaking the bottle?”
  • Word Riddles: These use puns, wordplay, or misdirection to challenge a solver’s thinking.

    Example: “What can travel all around the world while staying in the same corner?” (Answer: A stamp!)

Each type of brain teaser serves a different purpose, so it’s important to decide which one best fits your audience before beginning the design process.

Would you rather solve a plain text riddle like this:

“A woman was 70 years old in 2000 but just 60 years old in 2010. How is this possible?”

Or would you prefer tackling a vibrant, visually appealing image with a fun design?

How to Create Your Own Brain Teaser Images with Answers

Now, onto the fun part—creating your very own brain teaser images! Follow these simple steps to make riddles that are visually engaging and easy to solve.

1. Get the Right Tools

Instead of starting from scratch with complicated design software, use ready-made templates specifically designed for brain teasers.

Download the Viral Puzzle Templates from The Graphics Creator to simplify the design process.

2. Choose a Template

Pick a template based on the type of brain teaser you want to create—logic, math, lateral thinking, or word riddles. This will serve as the foundation for your puzzle.

A brain teaser template ready to be customized.

3. Customize the Image

  • Swap out images by dragging and dropping new ones.
  • Change the font, text color, or outline to make certain elements pop.
  • Add logos or mascots to personalize the design.
  • Use icons or objects to make the puzzle visually more exciting.

Modifying a brain teaser image is just a matter of a few clicks. See how easy it is?

Where to Use Your Brain Teasers

Once your brain teaser is ready, you’re going to want to show it off! Here’s where they work best:

  • Social Media: Great for engagement and generating comments.
  • Classrooms: Keeps students interested and improves problem-solving skills.
  • Emails & Websites: Makes content more interactive and attention-grabbing.
  • Marketing Campaigns: Encourages participation and shares.

Related Questions

What are the best brain teasers for kids?

Kids love bright, colorful puzzles with easy-to-understand questions. Choose riddles with objects they recognize, like animals, food, and toys.

An example puzzle: “What has hands but can’t clap?” (Answer: A clock!)


Ready to make your own brain teasers?

Get started with template designs at:

How to Make Logo Variations with Graphic Design Software

0
“`html

Your brand’s logo is like your business’s fingerprint—unique, recognizable, and hopefully not smudged across too many surfaces. It’s the single most important visual element that identifies your small business, so it needs to stand out.

And with a little strategic planning (because we all love adulting), your logo will always be ready to jump into action. Whether you’re posting on social media, creating a website, printing business cards, or just slapping it on a coffee mug because, well, why not?

Keep reading to learn about the different types of logo variations you need for your business, plus how to easily create them using graphic design software and logo templates.

What Are Logo Variations, and Why Should You Care?

Think of your logo variations as your wardrobe—one design just won’t fit every occasion. A logo variation is a modified version of your primary logo, designed to fit different spaces, backgrounds, and uses.

For example, your primary logo might look great on your website header, but have you ever tried stuffing it into a tiny Instagram profile? It’s like trying to fit into those jeans from five years ago—not happening. This is where logo variations save the day.

Find out how to create your primary and secondary logo as well as other variations.
Save this for later on Pinterest!

5 Essential Logo Variations You Need

Let’s talk variations—because you need options! Most professional brands use three to five logo variations. Here’s what you should have in your branding toolkit.

1. The Primary Logo

This is your brand’s main logo—the one you’ll use the most (and the one you spent way too much time picking colors for). It belongs on big things like your website header, brand materials, and social media cover photos.

  • Includes the full brand name
  • May have a tagline or slogan
  • Usually includes a graphic/icon
  • Works in large spaces but not always in small ones

2. The Secondary Logo

This is your original logo’s sidekick—kind of like Robin to Batman (but without the spandex). It’s a simplified version of your primary logo, used when your primary logo doesn’t fit.

  • May reformat text or remove unnecessary details
  • Works well on invoices, business cards, and social media
  • Keeps brand consistency without taking up too much space

3. The Submark (or Brandmark) Logo

This is your tiny but mighty logo variation! It’s a compact and simplified version of your brand—ideal for social media profile images, watermarks, stickers, and footers.

  • Usually consists of initials, a small icon, or a graphic mark
  • Looks great in circular profile images (hello, Instagram!)
  • Often used as a favicon for your website

4. Primary Logo Variation

Sometimes, your primary logo needs a quick wardrobe change—like wearing a white version on a dark background or a black version on light backgrounds.

  • Ensures your logo is visible on all backgrounds
  • Creates a cohesive look no matter where it’s placed
  • Includes color variations (because nobody likes a clashing logo)

5. Secondary Logo Variation

The same idea as your primary logo variation, but applied to your secondary logos. Because you never know when you’ll need a slightly different version to fit a tight space or different colored background.

  • Might include an outline for better visibility
  • Ensures flexibility for various marketing channels
  • Prevents unnecessary headaches when designing print or digital media

How to Make Logo Variations with Graphic Design Software

Now that you know the logo variations you need, let’s talk about how to create them without pulling your hair out. Luckily, tools like The Graphics Creator make it easy to design stunning logos and their variations!

Step 1: Start with Your Primary Logo

Your primary logo is your brand’s foundation, so nail that first. Choose fonts, colors, and a logo icon that represent your business and create a balanced design.

Step 2: Adjust for Secondary Logos

Remove non-essential elements and resize your logo to fit smaller spaces, like business cards and invoices.

Step 3: Create a Submark

Keep it simple—use your initials, a minimal design, or your main logo icon to create a compact version for social media and favicon use.

Step 4: Make Necessary Color Variations

Test your logo in black, white, and on different backgrounds to ensure readability.

FAQs

Do I really need all these logo variations?

Absolutely! It keeps your branding flexible across platforms.

Can I create my own logo variations?

Yes—easy-to-use tools like The Graphics Creator make the process simple.

And with that, you’re ready to design stunning logo variations like a pro. Happy branding!

“`

How to Get Your Online Business Noticed with Design

0

Imagine if you could grab attention for your business instantly with eye-catching graphics that make people stop scrolling.

Now, picture a world where instead of waiting (and waiting…) for customers to stumble upon your business, they come to you eager to buy. Sounds nice, right?

Guess what? You don’t need to pay a fortune for a designer or spend days learning advanced software. With the right tools, you can create graphics that drive clicks, follows, and sales—all by yourself.

No more designer back-and-forth, eye-watering revision fees, or confusing software. With a bit of creativity (and a little help from this guide), you’ll be ready to make professional-looking visuals in no time.

Keep reading, watch the videos, and let’s put your business in the spotlight using the power of design!


How to Get Your Online Business Noticed with Design

We live in an era where attention spans are officially shorter than a goldfish’s. If your business isn’t visually engaging, good luck getting noticed. Studies show that people process visuals 60,000 times faster than text. That’s right—your graphics need to do the heavy lifting.

Don’t worry, you don’t need to be a professional designer. With the right tools, templates, and strategies, you can create graphics that turn heads and get your business the visibility it deserves.

Why Great Design is Non-Negotiable

Think about your favorite brands. What do they all have in common? Strong, consistent, and memorable visuals. Whether it’s a snappy ad, a sleek website, or an eye-catching logo, design is what builds trust and recognition.

Here’s why investing in DIY graphics works in your favor:

  • Immediate visual impact: People decide whether to engage with content in a fraction of a second.
  • Brand consistency: Cohesive graphics keep your brand looking sharp across platforms.
  • Boosts social media engagement: High-quality visuals get more likes, shares, and comments.
  • Saves money: You won’t need to hire a designer for every single post or ad.

How to Create Stunning Graphics for Free

Now, I can hear you thinking, “But I don’t have any design skills!” No problem. With the right tools, creating scroll-stopping graphics is surprisingly easy (and yes, even fun).

Use Free Graphic Design Software

Say hello to The Graphics Creator, your new best friend in DIY design.

  • No complicated learning curve
  • Drag-and-drop functionality
  • Customizable templates for just about anything

Download it now, add your free bonus templates, and start creating graphics with zero restrictions (goodbye, annoying watermarks!).

Prefer working entirely online? No problem. Check out the Web Graphics Creator for easy cloud-based graphic designing.

How to Design Graphics for Maximum Impact

Follow these steps to create graphics that attract attention and drive results.

  • Choose a template: Select a pre-designed layout to save time.
  • Customize elements: Drag and drop images, text, and icons to fit your brand style.
  • Keep it simple: A cluttered design overwhelms viewers. Less is more.
  • Stick to a color palette: Consistency is key! Use your brand’s colors for recognition.
  • Use bold fonts for readability: Fancy scripts might look cool but can be impossible to read.

Ready to dive in? Watch this quick video to see The Graphics Creator in action:

Types of Graphics That Will Get Your Online Business Noticed

1. eCovers That Sell Your Digital Products

If you sell an ebook, online course, or any digital download, an eye-catching eCover makes it look valuable. Just check out this tutorial about creating stunning virtual covers:

2. Ads That Get Clicks

If you’re running social media ads or PPC campaigns, you need high-converting graphics. Learn how to design effective ad visuals here:

3. YouTube Thumbnails That Drive Views

Your video won’t get views if the thumbnail isn’t grabbing attention. Make your channel stand out with YouTube graphics like these:

FAQs

Can I really design professional graphics with no experience?

Absolutely! With drag-and-drop functionality and ready-made templates, you’ll be creating pro-level designs in minutes.

How do I keep my designs looking professional?

Stick to a clean layout, use a consistent color scheme, avoid too many fonts, and always check readability.

How often should I create new graphics?

It depends on your marketing strategy, but ideally, update your ads, social media headers, and promotions regularly.

Get Your Business Noticed—Starting Today!

No more staring at your screen wondering what to post next. With The Graphics Creator, making standout designs is simple.

Want even more templates?

Supercharge your visuals with extra design packs. Get them here.

5 Free Gift Ideas Small Business Owners Can Create in Minutes

0

Running a small business isn’t always sunshine and record-breaking sales. Sometimes, it’s tight budgets, long nights, and enough stress to make your coffee nervous. If your business is going through a rough patch, you’re not alone. But here’s the deal—your employees, clients, and business partners probably feel the strain too. Meeting the challenge head-on with creativity and appreciation can boost morale and keep connections strong.

But how do you show appreciation when your budget is tighter than a jar lid after a weightlifting contest?

The secret? Thoughtful, free (or nearly free) gifts that people actually want.

5 Free Gift Ideas Small Business Owners Can Create in Minutes

You’ve probably already done something like this for family and friends, so why not for your business? These ideas are simple, thoughtful, and have a high impact. Best of all, they’re practically cost-free.

And here’s what makes it easy: all you need is a personalized coupon or a creatively designed certificate. That’s it!

DIY vs. Software: Two Ways to Make Your Own Gifts

  • Go old-school: Grab some paper, colorful markers, and get crafty. Scribbled edges and all, a handwritten coupon still works magic.
  • Use ready-made templates: If your artistic skills peaked in kindergarten, save time with The Graphics Creator. You can create sleek, professional coupons and certificates in minutes—no design experience needed.

1. Give Your Employees Time Off (Because Rested Employees Are Happy Employees)

Imagine being handed a coupon for a guilt-free afternoon off. Feels good, right? Well, your employees will feel the same way.

You can customize this gift however you like:

  • Offer them a half-day (or an extra hour to sleep in).
  • Let them pick a day of their choice.
  • Make it a “work-from-home” day if they prefer comfort over commute.

2. Offer Your Service to a Charitable Organization for Free

Want your business to make an impact? Try donating your time or services to a cause your employees and customers care about. People love businesses that give back, and it gives your brand an extra dose of generosity (and good PR!).

How to do it:

  • Offer free products or services to a local charity.
  • Let employees pick an organization they’d like the business to support.
  • Encourage customers to nominate a cause you can help.
Create this Certificate with The Graphics Creator to honor those in need

3. Show Appreciation with a Personalized Certificate

Who doesn’t love a little recognition? A personalized certificate of appreciation shows genuine gratitude and makes a lasting impression.

Certificate of Appreciation example

4. Give an IOU for Something Special

An IOU is a heartfelt way to promise future rewards—extra vacation days, a free product, or a celebratory meal when things look better financially.

Small Business owners can create a gift certificate to give employees

5. Offer a Free Consultation or VIP Experience

Your expertise is valuable! Offer free consultations or an exclusive session for VIP clients. It builds loyalty and keeps them engaged with your business.

Certificate coupon for a free gift.

Conclusion

Showing appreciation doesn’t have to empty your wallet. With a little creativity and thoughtfulness, you can make employees and clients feel valued—even on a tight budget.

Get free templates and start creating gifts today!

5 Super Simple Marketing Ideas to Help Grow Your Online Business

0

5 Super Simple Marketing Ideas to Help Grow Your Online Business

Every solopreneur and small business owner wants one thing—more growth, and preferably fast. But let’s be real: marketing can sometimes feel like a never-ending to-do list.

The good news? There are a few super simple marketing ideas that can help you grow your business without breaking into a panic every time a new trend pops up.

So, if you often find yourself scrolling through social media, wondering why your competitor seems to have cracked the marketing code while you’re still staring blankly at your to-do list, you’re in the right place.

Here are five ridiculously easy (yet genius) marketing strategies that you can start using today to boost your business.

Why These Simple Marketing Strategies Work

Sometimes, we overlook the easiest marketing ideas because they seem too… well, obvious. But the truth is, these fundamental strategies are often the most powerful ones.

– They don’t require a marketing degree to implement.
– You can start using them today (yes, even if your coffee hasn’t kicked in yet).
– They can help you build sustainable business growth without fancy funnels or confusing jargon.

If you want to start seeing results, stick with me—these five ideas might be exactly what your business needs.

Idea #1: Don’t Put All Your Eggs in One Basket!

We’ve all heard the saying, and yet, when it comes to business, many entrepreneurs still make the mistake of relying on just one product, service, or marketing channel. Newsflash: that’s risky!

Imagine this—you’re selling a single product, and suddenly *POOF!* demand dries up. Now what? You don’t want to find yourself panic-Googling “How to make money fast” at 2 AM.

Instead, diversify your income streams by:
✔ Offering multiple products or services
✔ Creating a secondary business (or side hustle)
✔ Selling digital downloads, courses, or memberships

This concept is the same reason financial experts tell you to buy multiple stocks instead of betting all your money on one. Diversification protects your business from unpredictable downturns.

That way, even if one product or service slows down, you still have other revenue streams keeping your business afloat.

Idea #2: Always Stay in Touch

Think of your customers like a new friendship—if you disappear for months, they’re probably going to forget you exist.

Staying in touch with your audience isn’t just a “nice to do” thing; it’s essential for growing your business. And here’s a little secret: It’s easier to sell to someone who’s already bought from you before than to someone new.

How to stay connected?
✔ Send regular emails to your subscribers (without being spammy).
✔ Start a Facebook group or community where you can nurture your audience.
✔ Post consistently on social media (and mix in some behind-the-scenes or fun posts).

And don’t just dump plain text into the digital void—make your marketing visually appealing.
Meaningful designs will actually help you sell more. Check out these design ideas.

Even if you’re not a graphic designer, using tools like Laughingbird Software can help you create professional-looking images that stand out.

Idea #3: Don’t Be “That Internet Marketer”

Ahh, the infamous “get rich by tomorrow” internet marketers. You know the ones. They promise you’ll make six figures overnight if you just buy their $997 magic course.

Spoiler alert: People can smell BS from a mile away.

Instead of making claims that sound too good to be true (because let’s be honest, they are), focus on these principles:
✔ Be honest about how your product or service helps.
✔ Show real results, testimonials, and case studies.
✔ Talk about how your product solves an actual problem.

Nobody needs more over-the-top sales pitches. What people really want is a clear, trustworthy solution to a problem they’re struggling with. Be the person who delivers that.

Idea #4: State Exact Numbers

You might think saying something like, “80% of my customers love this!” sounds great, right? Nope. It’s too vague.

Being specific makes your business sound WAY more credible.

✔ Instead of: “Most people love my coaching program!”
✔ Say this: “97 out of 100 clients reported an increase in revenue within 3 months of using my coaching program.”

See the difference? One sounds generic. The other sounds solid, data-backed, and trustworthy.

Pro tip: If you’re using numbers in your marketing, pull them from real data and avoid rounding them up too much. A stat like “17.7% of customers” feels more believable than “20%”—psychology at work!

Idea #5: Create an Absolutely Irresistible Offer

Let’s be real—nobody can resist a good deal. But to truly make an offer irresistible, you need to go beyond just slapping a discount on it.

Here’s what makes an offer impossible to ignore:
✔ A great discount (*but not so much that people question its value*).
✔ Valuable bonuses (ebooks, templates, exclusive access, etc.).
✔ Limited-time availability (because urgency drives action).

Try a combo like this:
Instead of just offering a 25% discount on your product, also throw in a FREE workbook, checklist, or bonus training session. Now you’re not just making a sale—you’re giving extra value.

And don’t forget—the way you present your offer matters. People are *visual* creatures, so create eye-catching promotions. Use professional-looking e-covers to make your bonuses look even more desirable.

Final Thoughts

These five simple marketing strategies might not be flashy or complicated, but they work. And the best part? You don’t need a massive budget, a giant team, or a PhD in marketing to use them.

The bottom line:
✔ Diversify your income streams.
✔ Stay in touch with your customers.
✔ Be honest—no scammy marketing tactics.
✔ Use real numbers to build trust.
✔ Craft offers that people can’t resist.

Now, if you’re looking for an effortless way to create stunning marketing materials (without hiring a designer), check out Laughingbird Software. It’ll save you hours of frustration and make your business look pro-level.

Grab super easy-to-use software and ready-made templates to create eye-catching ads, e-covers, and more!


Create Graphics in minutes with The Graphics Creator software

CLICK THE IMAGE ABOVE TO SEE ALL OF THE TEMPLATES YOU CAN USE TO QUICKLY CREATE YOUR GRAPHICS!

FAQs

How can I make my marketing more effective as a solopreneur?
Focus on consistency. Small, daily efforts in engaging your audience, improving your offer, and creating content will compound over time.

Why is staying in touch with customers so important?
Customers who have already bought from you are way more likely to buy again. Keeping in touch builds trust and keeps you top of mind.

How do I make my offers more enticing?
Combine discounts with valuable bonuses and create urgency. People love getting “extra” for their money, so give them something they can’t refuse!

Facebook Business Page – How to Create One That Sells Your Product

0

In this digital era, if your business isn’t online, does it even exist? Having an online presence is crucial for success. And let’s be honest, Facebook is basically the town square of the internet. So, having a well-optimized Facebook Business Page to sell your product can give you a serious edge in reaching your sales goals.

But here’s the thing—simply creating a page and letting it collect virtual dust isn’t going to cut it. Like any powerful tool, you need to know how to use your Facebook Business Page effectively to get substantial results.

So, let’s dive in and build a business page that not only showcases your brand but also grabs attention and drives sales.

How to Create a Facebook Business Page That Sells Your Product

Think of your Facebook Business Page as your brand’s digital storefront. First impressions matter, and an optimized, visually appealing page will draw visitors in. Here’s how to set one up the right way:

1. Set Up Your Page with a Clear Goal

Before you dive into designing and posting, ask yourself:

  • What’s the purpose of this page? Selling products, driving traffic to your website, or building brand awareness?
  • How do I want people to interact with my page? Should they book appointments, send messages, or shop directly from Facebook?

By defining your goals, you’ll create content and strategies that actually work.

2. Make Your Page Look Professional

You wouldn’t walk into a messy, unorganized store, would you? Treat your Facebook Business Page the same way. Here’s what you need to make it visually appealing:

  • Choose the Right Category: Select a business category that accurately describes what you do (e.g., Local Business, Brand, or Product).
  • Optimize Your Business Details: Fill out every single field—your business name, website, contact email, and phone number. Half-filled pages scream untrustworthy!
  • Use High-Quality Branding: Your profile picture should either be a clear logo or a professional image of yourself. Your cover photo should be eye-catching and clearly explain what you do.

3. Use Facebook’s “Call to Action” Button

Did you know Facebook lets you add a customizable button to your page? This magical little button can guide visitors toward booking a call, following, or even shopping from your page.

Here’s how to set it up:

  • Click the “Edit” button on your business page.
  • Choose an action like “Shop Now” or “Contact Us.”
  • Add the necessary information so visitors are directed exactly where you want them to go.

Use Facebook's new button on your business page to get your visitors to take action. Offer something of value that'll make them click.

4. Create a High-Quality Facebook Cover Photo

Remember, your Facebook cover photo isn’t just pretty decoration—it’s prime real estate! Make sure it:

  • Reflects your brand’s personality and industry.
  • Is optimized for Facebook’s latest size requirements (check before uploading!).
  • Includes a Call to Action—something like “Grab Your Free Guide” can do wonders for engagement.

5. Post Content That Attracts and Converts

Your Facebook Business Page isn’t a ghost town… or at least, it shouldn’t be! Keep your audience engaged by posting:

  • Valuable content: Share tips, tutorials, and advice related to your product.
  • Engaging media: Eye-catching images, videos, and memes work great.
  • Direct offers: Be clear about what you’re selling and why your audience needs it.

6. Learn from Facebook’s Page Insights

Facebook provides valuable insight into your audience’s behavior, demographics, and engagement. Check it regularly under the “Insights” tab so you know what’s working and what’s flopping.

7. Engage with Your Audience Like a Pro

It’s called “social” media for a reason—engage with your followers! Answer comments, reply to messages, and most importantly… show some personality. Nobody likes a robotic brand.

FAQs

How often should I post on my Facebook Business Page?
Posting once a day or at least 3-5 times a week is a good starting point. But consistency is more important than frequency—never go weeks without posting.

Should I use Facebook Ads to promote my page?
Absolutely! Organic reach is great, but Facebook Ads can turbocharge your efforts, especially if you target the right audience.

What kind of posts get the most engagement?
Posts that offer value—entertaining, informative, or inspiring content. And yes, funny memes count!

Can I sell directly from my Facebook Business Page?
Yes! Facebook offers a shop feature where you can add products and let customers purchase without leaving Facebook.

Final Thoughts

Creating a Facebook Business Page that actually sells your product isn’t rocket science—but it does require a little effort. By optimizing your page, engaging with your audience, and posting valuable content consistently, you’ll turn your page into a revenue machine.

Need help creating professional-looking Facebook graphics? Grab the FREE Graphics Creator to design eye-catching images for your posts!

Grab the Free Graphics Creator software download here

6 Simple Marketing Design Tutorials for Creative Online Marketers

0

As an online marketer, you probably spend a ridiculous amount of time crafting ads and content to grab attention. But have you ever stopped to wonder… are you spending *too* much time? Are you drowning in the never-ending loop of designing, editing, tweaking, and re-designing your marketing materials?

Can you whip up eye-catching visuals in minutes, or does your creative process involve sacrificing sleep, patience, and maybe even a small piece of your sanity? More importantly, do you even know which graphics and images will actually work for your marketing?

I get it. Photoshop and Illustrator may as well be foreign languages, and who has the time (or the artistic talent) to master them? I sure don’t! That’s why I skip the complicated tools and focus on quick, budget-friendly solutions that work. Because let’s be real—I’m an online business owner, not Michelangelo.

The good news? You don’t need to suffer through a crash course in graphic design or break the bank on expensive software. You just need smart, simple strategies to design like a pro—without actually being one.

How to Create Designs for Marketing Fast

Let’s cut to the chase: marketing design should be **easy**. And guess what? You don’t need a degree in digital art to make it happen. With the right tools and techniques, you can crank out professional-looking graphics in **minutes.** Yes, minutes. Not hours. Not days.

That’s why I use **The Graphics Creator**—a lifesaver for marketers like you and me who need high-quality designs *stat*. If you want to follow along with these tutorials, grab your free copy of The Graphics Creator. It’s FREE. And free is my favorite price. 🙂

Marketers: Get Your Free Graphics Creator Software and Templates

Online Marketers: Click here to grab your free trial of The Graphics Creator software and templates.
CLICK THE IMAGE TO GET FREE DESIGN SOFTWARE AND TEMPLATES FOR MARKETING

6 Simple Marketing Design Tutorials for Creative Online Marketers

Now, let’s dive into **six incredibly easy marketing design tutorials** that will take your ads, social media graphics, and website visuals to the next level. Each tutorial is packed with pro tips, quick tricks, and step-by-step walkthroughs to help you create eye-catching, scroll-stopping graphics in minutes.

1. How to Market to Your Perfect Niche Audience

Finding your audience is half the battle. The other half? Creating visuals that **speak directly** to them. If your graphics aren’t connecting with your niche, your marketing will fall flat.

Watch this tutorial to learn how to **identify and design for your unique audience** using The Ad Creator templates:

2. How to Use Marketing Design to Bring in More Website Traffic

What if I told you that **one well-designed image** could bring in more website traffic? No, really. This tutorial shows you how to use **visual storytelling** to drive clicks and engagement.

Check out the tutorial and learn how to make **standout blog graphics** using Blog Graphics templates:

Conclusion: Keep Marketing Design Simple

Marketing design doesn’t have to be a **never-ending struggle**. By using smart tools and following these simple tutorials, you can create professional graphics **fast**—without the stress, the headaches, or the all-night Photoshop sessions.

So, go ahead: save time, keep your sanity intact, and **start designing like a pro**.

Want to learn more? Check out Laughingbird Software for even more marketing design tips and resources.

Simple marketing design tutorials help online marketers create and publish the designs they need for advertising a small business.
Please Share on Social Media!